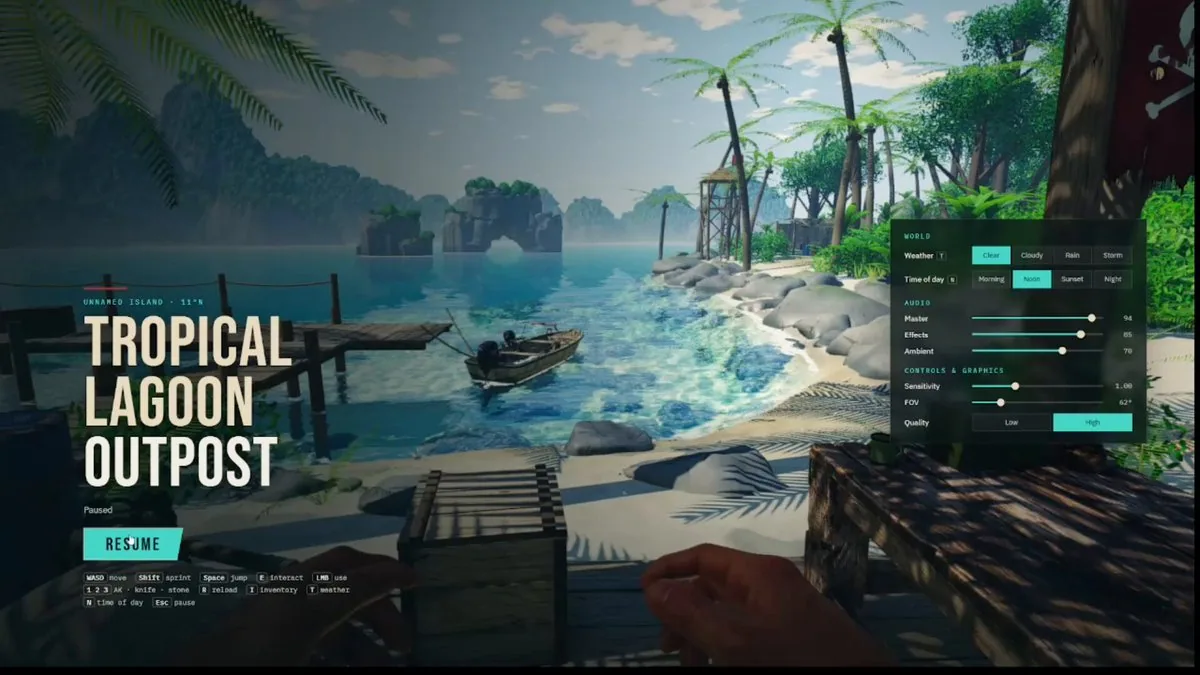
CLOSING THE GAP TO THE REFERENCE (Stages 6–11)

Stages 1–5 are done: the world, controller, outpost, water, sky, vegetation, hands, weapons, inventory, weather, time of day, audio and menus all work, and the layout already matches the reference. What's missing is image quality. Right now the frame looks like clean low-poly under a milky haze. The reference looks like a saturated, high-contrast, gritty, lived-in photograph. Stages 6–11 close that gap.

Global rules for Stages 6–11:
- Every new effect sits behind a quality flag. Low must stay fast.
- Don't break earlier stages: time of day, weather, rain, wetness and lightning must all still combine correctly. At the end of each stage, check Noon/Clear and Sunset/Storm once.
- Keep existing APIs compatible: getWaterHeight(x,z), addRipple(x,z,strength), setSkyState({...}), shared globals (wind, wetness, rain, time) and the effects event bus.
- Rebuild the standalone bundle after every change and do one console-error check. No test loops.
- Run each stage in a fresh session. Do only that stage.

────────────────────────
STAGE 6 — Light, atmosphere, color grading, dappled shadows (reasoning: High)
Goal: remove the milky haze and get a punchy tropical-noon frame with lace-like leaf shadows. This stage is the cheapest and has the biggest impact.

1. Haze/fog: cut daytime fog density and height sharply. Fog only lies low at the foot of the mountains and far out over the water. Aerial perspective is blue (#9cc3dc → #cfe6f5), never white. Mountains read in 3 depth layers, with more blue on each layer further back.
2. Sky: zenith ~#4f9fe0 fading to a #cfe6f5 horizon. Cumulus clouds get crisp, sunlit white tops, blue-grey undersides and a silver lining near the sun. Denser clouds, less smeared vapor.
3. Sun and ambient: stronger sun; darker, cooler ambient/hemisphere light so shadows go deep (shadowed areas at ~15–20% of lit brightness); warm bounce light from the sand.
4. Grading: an S-curve for contrast, saturation ~×1.25, slightly lower exposure, warm highlights and cool turquoise shadows. Add a contrast-adaptive sharpening pass after FXAA. Raise the bloom threshold so it never washes the frame out. God rays only through foliage, not across the whole screen. Make sure eye adaptation doesn't brighten the image back up.
5. Dappled shadows: add 1–2 palms over the shelter, with one trunk and its fronds framing the top-left of the starting view like the reference. Leaves cast alpha-tested shadows (custom depth/distance materials using the leaf mask). Also add an animated light cookie that projects leaf dapples inside the shelter and sways with the wind. Tighten the shadow frustum/cascade near the player so shadows on the table stay crisp.
6. Ambient occlusion: stronger SSAO where surfaces meet (table/deck, crates, legs, props on the table), plus small contact-shadow decals under objects.
7. First-person hands: warmer skin, a bit more fill light from the sand, and scale/position closer to the reference (large, low in frame).
Acceptance: the starting frame next to the reference has comparable contrast and saturation, a deep blue sky, and visible leaf dapples on the deck and table.

────────────────────────
STAGE 7 — FLAGSHIP WATER (reasoning: Max)
Goal: water is the star of the game, at modern AAA quality — something you'd watch for minutes. Rewrite the water module in depth, not as patches, while keeping the CPU height query (getWaterHeight) exactly in sync with the GPU surface.

7.1 Wave model
- Large swell: 6–8 Gerstner harmonics using the correct deep-water dispersion relation. The CPU height query evaluates the same harmonics (iterative inverse displacement).
- Fine surface: GPU FFT ocean spectrum (Phillips/JONSWAP) with ping-pong render targets, 128²–256², in 2–3 cascades at different scales. Output displacement, normals and a Jacobian map for foam. Low quality: 1 cascade at 64² or baked tileable normals.
- No visible tiling: non-multiple cascade sizes plus rotation. In the distance, filter normals (Toksvig/LEAN-style) instead of letting them shimmer.
- Shallow water: waves shoal (grow steeper and shorter as depth drops) and refract toward the shore along the seabed gradient. Inside the lagoon it's calm and almost mirror-like; beyond the reef it's livelier.

7.2 Optics
- Per-channel RGB Beer–Lambert absorption over the real underwater ray length (from the scene depth buffer), plus in-scattering (#1fb0b8 / #16739e). Result: 0–0.5 m of water is nearly colorless, 1–3 m is vivid turquoise (#46d6c8), 6 m and deeper is deep blue, with a sharp turquoise-to-blue edge at the reef drop-off like the reference.
- Screen-space refraction offset by the normal and scaled by depth. Use a depth test so objects above the surface don't leak into the refraction. Add subtle chromatic dispersion.
- Reflections: screen-space reflections (High) with a sky/PMREM fallback, plus a half-resolution planar reflection over the near lagoon (High) so the pier, boat and palms reflect properly. Schlick Fresnel with F0 = 0.02: clear up close, mirror-like at grazing angles.
- Sun: a tight GGX highlight plus stochastic micro-facet glitter sparkling on wave crests. A proper sun glitter path at sunset, a moon path at night.
- Subsurface scattering: backlit wave crests glow turquoise.
- The sky and clouds in reflections come from the same sky function, and clouds move in the reflection too.

7.3 Seabed, caustics, reef
- Animated caustics (layered Voronoi or a baked caustic texture with perspective warp), RGB chromatic split, intensity by depth. Project them onto everything underwater: sand, rocks, pier piles, boat hull, the player's legs. Caustics fade in shadow (sample the shadow map).
- Reef: 40–80 instanced coral/rock clusters on the lagoon floor (the dark patches in the reference), swaying seagrass, sand ripples on the bottom (normal map), scattered shells. The seabed gets its own darker wet material.
- Underwater light shafts when looking up from below the surface.

7.4 Shore and foam
- Swash: a thin sheet of water runs up the sand and drains back. It leaves a dark wet band that dries with a delay, and a bubbly foam line rides on its leading edge.
- Foam: a real procedural bubble/foam texture, not raw noise. It spawns on crests (from the FFT Jacobian), along the shoreline, and around rocks, piles and the boat (from depth difference). It persists and decays over time (an accumulation buffer on High).
- Rings of foam and small ripples around piles and rocks standing in the water.

7.5 Interactivity
- addRipple feeds a real height-field wave simulation: a 256² ping-pong grid centered on the player that scrolls with them. Stone splashes, bullet impacts, raindrops and the player's footsteps in water create rings that reflect and interfere physically.
- Wake/Kelvin-style bow waves from the player wading.
- Buoyancy: the boat, fallen crates, shells and stones bob using the height query plus the surface normal. The boat tugs at its mooring lines. Fix the boat: hull above the waterline, clearly visible next to the pier in the starting frame.
- Underwater mode (camera below the surface): water-colored underwater fog, distortion, caustic light shafts, muffled audio (emit an 'underwater' event for the audio system), and a correct half-in/half-out waterline split across the screen.

7.6 Weather and time hooks
- Expose every new parameter through water.setParams({...}), driven by the weather/time compositor: wind drives the spectrum (flat calm when clear → whitecaps in a storm), rain adds droplet rings to the height field plus surface roughness, night gives a moon path, sunset a golden path.

7.7 Performance
- High: FFT with 2 cascades at 256², planar reflection + SSR, height field at 256². Low: 1 cascade at 64² (or baked normals), no planar reflection/SSR, height field at 128². Target: water under ~4 ms per frame on a mid-range GPU at High.
Acceptance: the starting frame shows crystal-clear turquoise shallows with a visible reef and caustics, a crisp drop-off into deep blue, a living swash line on the beach, and the pier and boat reflected. A thrown stone produces physically believable interfering rings.

────────────────────────
STAGE 8 — Terrain: karst mountains, rocks, beach, jungle (reasoning: High)
1. Karst mountains: ridged-multifractal displacement on top of the current shapes, sheer vertical walls, ledges and erosion gullies. A slope-based shader: steep areas are grey limestone with vertical streaks; ledges and gentle slopes are green canopy (a crown-shaped noise with occlusion between crowns). Thousands of cheap instanced canopy billboards on the slopes (one draw call). The sea arch and rock islet use the same materials.
2. Boulders: noise-deformed rocks with sharp ridged facets, grouped in clusters of 3–7, half-buried in sand or water, moss on top, and a dark wet band at the waterline. Triplanar texturing.
3. Jungle: broadleaf trees with clumped card-based crowns; palms of different ages and leans; dense undergrowth on the right-hand slope (ferns, bushes, banana/monstera) at 3–4× the current density with LODs; vines between trees; grass along the beach edge. No more "lawn": dark soil and leaf litter under the trees.
4. Beach: wind ripples (normal map), a wet band synced with the Stage 7 swash, pebbles, driftwood, fallen palm fronds, coconuts; a gradual transition from sand to soil to jungle, with grass.
5. Move the hut and the watchtower 20–30% closer into the starting frame if it doesn't break collisions or paths.

────────────────────────
STAGE 9 — Next-level procedural materials (reasoning: High)
All generators produce albedo/normal/roughness(/AO) maps at 1024² (512² on Low), cached.
1. Old weathered wood: stretched-noise grain, knots, cracks, a different tone and UV offset per plank, dark seams, grime in the corners, sun bleaching, worn light edges (from curvature). No striped "zebra" look. Used for the deck, table, pier, crates and posts.
2. Metal: paint → chipping → rust, driven by curvature/noise masks, plus rust streaks and scratches (barrel, ammo can, lantern). The mug gets chipped enamel.
3. Fabric: canvas with visible weave, stains and faded folds. Flags in faded rust-brown (#a8352a → rust), with torn alpha edges and a dirty skull.
4. Leopard pelt: correct rosette pattern plus fur shells (4–6 layers, High only) or a dense normal map, with a jagged hide edge.
5. Rope: twisted-fiber normals, thicker, frayed ends.
6. Rock and sand: triplanar mapping, moss by normal direction; grainy sand with tiny crystal glints in the sun.
If hand-made tileable PBR texture sets exist locally, use them instead of the matching generator (and embed them in the standalone bundle).

────────────────────────
STAGE 10 — Foreground props + custom models (reasoning: Medium)
1. Load any local .glb models from the models folder through the existing loader, keeping the procedural fallback. For each model: real-world scale in meters, grounding on its surface, colliders, shadows, wetness injection, and the Stage 3 interactions (inspecting the lantern/mug/map; the crate lid opens if the model has a separate lid part, otherwise keep the procedural lid).
2. Table: make the props larger and lay them out like the reference — the AK diagonally across the whole table, the knife on the front edge, the map under the knife, the mug, the ammo can, the lantern on the right, the bottle.
3. Left side: the cot (tube frame, sagging canvas, a plump pillow), the pelt hanging over its edge, a backpack and a crate next to the cot, a rusty barrel.
4. A torn flag hanging from the canopy at the top right, like the reference; rope lashings on the posts.
5. The boat moored at the pier (buoyancy from Stage 7), a crate on the pier, mooring ropes to the piles.
6. Hut and watchtower: corrugated tin roof, canvas awning, barrels, crates.

────────────────────────
STAGE 11 — Performance + final match against the reference (reasoning: Medium)
1. An FPS/frame-time overlay (F3) with a per-pass breakdown. Budget: ≥60 FPS on High on a mid-range discrete GPU, ≥30 FPS on Low on a modern iGPU.
2. Optimize: instancing, LODs, distance culling, half-resolution for the expensive passes, cached and compressed textures, proper disposal.
3. Take one screenshot from the starting view next to the reference and do a final palette tune. Check every time-of-day × weather combination.
4. Rebuild the bundle, do one console check, update the status log.
한국어 번역
레퍼런스와의 격차 좁히기 (스테이지 6–11)

스테이지 1–5는 완료되었습니다: 월드, 컨트롤러, 전초기지, 물, 하늘, 식생, 손, 무기, 인벤토리, 날씨, 시간대, 오디오, 메뉴가 모두 작동하며 레이아웃도 이미 레퍼런스와 일치합니다. 부족한 것은 이미지 품질입니다. 지금 프레임은 뿌연 안개 아래의 깔끔한 로우폴리처럼 보입니다. 레퍼런스는 채도가 높고 대비가 강하며 거칠고 생활감이 배어 있는 사진처럼 보입니다. 스테이지 6–11이 그 격차를 좁힙니다.

스테이지 6–11 전역 규칙:
- 모든 신규 이펙트는 품질 플래그 뒤에 둡니다. Low는 반드시 빨라야 합니다.
- 이전 스테이지를 깨뜨리지 마세요: 시간대, 날씨, 비, 젖음, 번개가 모두 여전히 올바르게 조합되어야 합니다. 각 스테이지가 끝나면 Noon/Clear와 Sunset/Storm을 한 번씩 확인하세요.
- 기존 API 호환성을 유지하세요: getWaterHeight(x,z), addRipple(x,z,strength), setSkyState({...}), 공유 전역 변수(wind, wetness, rain, time) 및 이펙트 이벤트 버스.
- 모든 변경 후 스탠드얼론 번들을 다시 빌드하고 콘솔 오류 검사를 한 번 하세요. 테스트 루프는 하지 마세요.
- 각 스테이지는 새 세션에서 실행하세요. 해당 스테이지 작업만 하세요.

────────────────────────
스테이지 6 — 빛, 대기, 컬러 그레이딩, 얼룩 그림자 (reasoning: High)
목표: 뿌연 안개를 없애고 레이스 같은 잎 그림자가 있는 강렬한 열대 정오 프레임을 만드는 것. 이 스테이지는 비용이 가장 적게 들고 효과가 가장 큽니다.

1. 안개/포그: 낮 포그의 밀도와 높이를 크게 줄입니다. 포그는 산기슭의 낮은 곳과 멀리 수면 위에만 깔립니다. 공기 원근은 파란색(#9cc3dc → #cfe6f5)이며 절대 흰색이 아닙니다. 산은 3개의 깊이 레이어로 읽히고, 뒤쪽 레이어일수록 파란기가 더 강합니다.
2. 하늘: 천정은 ~#4f9fe0에서 #cfe6f5 지평선으로 페이드됩니다. 적운은 햇빛을 받은 선명한 흰색 상단, 청회색 하단, 태양 근처의 은빛 테두리를 갖습니다. 구름은 더 밀도 있게, 번진 수증기는 더 적게.
3. 태양과 앰비언트: 태양은 더 강하게; 앰비언트/반구광은 더 어둡고 차갑게 하여 그림자가 깊어지게 합니다(그림자 영역은 조명 밝기의 ~15–20%); 모래에서 반사되는 따뜻한 바운스 라이트.
4. 그레이딩: 대비를 위한 S-커브, 채도 ~×1.25, 약간 낮춘 노출, 따뜻한 하이라이트와 차가운 터콰이즈 그림자. FXAA 뒤에 대비 적응형 샤프닝 패스를 추가합니다. 블룸 임계값을 높여 프레임이 뿌옇게 날아가지 않게 합니다. 갓 레이는 잎을 통해서만 지나가고 화면 전체를 가로지르지 않습니다. 눈 적응이 이미지를 다시 밝히지 않도록 하세요.
5. 얼룩 그림자: 쉼터 위에 야자수 1–2그루를 추가하고, 그중 한 그루의 줄기와 잎이 레퍼런스처럼 시작 뷰의 좌상단을 프레이밍하게 합니다. 잎은 알파 테스트 그림자를 드리웁니다(잎 마스크를 사용하는 커스텀 깊이/거리 머티리얼). 쉼터 내부에 잎 얼룩을 투영하고 바람에 흔들리는 애니메이션 라이트 쿠키도 추가합니다. 플레이어 근처의 그림자 프러스텀/캐스케이드를 조여 테이블 위 그림자가 선명하게 유지되도록 합니다.
6. 앰비언트 오클루전: 면이 만나는 곳(테이블/데크, 상자, 다리, 테이블 위 소품)에 더 강한 SSAO를, 오브젝트 아래에 작은 컨택트 섀도 데칼을 추가합니다.
7. 1인칭 손: 피부를 더 따뜻하게, 모래에서 오는 필 라이트를 조금 더, 크기/위치를 레퍼런스에 더 가깝게(크고 프레임 아래쪽에).
합격 기준: 레퍼런스 옆에 놓은 시작 프레임이 비슷한 대비와 채도, 짙은 파란 하늘, 데크와 테이블 위에 보이는 잎 얼룩을 갖추고 있어야 합니다.

────────────────────────
스테이지 7 — 플래그십 물 (reasoning: Max)
목표: 물이 게임의 주인공이며 현대 AAA 품질 — 몇 분이고 넋 놓고 바라보게 되는 수준. 워터 모듈을 패치가 아니라 근본부터 다시 작성하되, CPU 높이 쿼리(getWaterHeight)를 GPU 표면과 정확히 동기화된 상태로 유지합니다.

7.1 파도 모델
- 큰 너울: 올바른 심해 분산 관계를 사용하는 6–8개의 Gerstner 하모닉. CPU 높이 쿼리는 동일한 하모닉을 평가합니다(반복 역변위).
- 미세 표면: 핑퐁 렌더 타깃을 사용하는 GPU FFT 해양 스펙트럼(Phillips/JONSWAP), 128²–256², 서로 다른 스케일의 2–3개 캐스케이드. 변위, 노멀, 거품용 Jacobian 맵을 출력합니다. Low 품질: 64²의 캐스케이드 1개 또는 베이크된 타일러블 노멀.
- 눈에 보이는 타일링 없음: 배수 관계가 아닌 캐스케이드 크기와 회전. 원거리에서는 노멀이 반짝이게 두지 말고 필터링합니다(Toksvig/LEAN 방식).
- 얕은 물: 파도가 천수화되어(수심이 줄수록 더 가파르고 짧아짐) 해저 경사를 따라 해안 쪽으로 굴절합니다. 라군 안쪽은 잔잔하고 거의 거울 같으며, 리프 밖은 더 활기찹니다.

7.2 광학
- 실제 수중 광선 길이(씬 깊이 버퍼에서)에 대한 채널별 RGB Beer–Lambert 흡수와 인스캐터링(#1fb0b8 / #16739e). 결과: 수심 0–0.5 m에서는 거의 무색, 1–3 m에서는 선명한 터콰이즈(#46d6c8), 6 m 이상에서는 짙은 파란색이며, 레퍼런스처럼 리프 낙차에서 터콰이즈에서 파란색으로 넘어가는 날카로운 경계가 생깁니다.
- 노멀로 오프셋되고 깊이로 스케일된 스크린 스페이스 굴절. 깊이 테스트를 사용해 수면 위 오브젝트가 굴절로 새어 들어오지 않게 합니다. 미세한 색수차를 추가합니다.
- 반사: 하늘/PMREM 폴백이 있는 스크린 스페이스 반사(High), 그리고 부두, 보트, 야자수가 제대로 반사되도록 근거리 라군 위의 하프 해상도 평면 반사(High). F0 = 0.02인 Schlick 프레넬: 가까이서는 투명하고, 스치는 각도에서는 거울처럼.
- 태양: 타이트한 GGX 하이라이트와 파도 마루에서 반짝이는 확률적 마이크로 패싯 글리터. 일몰에는 제대로 된 태양 글리터 경로, 밤에는 달 경로.
- 서브서피스 스캐터링: 역광을 받은 파도 마루가 터콰이즈로 빛납니다.
- 반사 속 하늘과 구름은 동일한 하늘 함수에서 나오며, 반사 속에서 구름도 움직입니다.

7.3 해저, 코스틱스, 리프
- 애니메이션 코스틱스(레이어드 보로노이 또는 원근 왜곡을 적용한 베이크 코스틱 텍스처), RGB 색수차 분리, 깊이에 따른 강도. 수중의 모든 것에 투영합니다: 모래, 바위, 부두 말뚝, 보트 선체, 플레이어의 다리. 코스틱스는 그림자 속에서 페이드됩니다(섀도 맵 샘플링).
- 리프: 라군 바닥에 40–80개의 인스턴스 산호/바위 클러스터(레퍼런스의 어두운 패치), 흔들리는 해초, 바닥의 모래 물결(노멀 맵), 흩어진 조개껍데기. 해저는 자체적으로 더 어두운 젖은 머티리얼을 갖습니다.
- 수면 아래에서 위를 올려다볼 때의 수중 광선.

7.4 해안과 거품
- 스워시: 얇은 물막이 모래 위로 올라갔다가 다시 빠집니다. 늦게 마르는 어두운 젖은 띠를 남기고, 거품이 있는 라인이 그 선단을 타고 이동합니다.
- 거품: 원시 노이즈가 아닌 실제 절차적 버블/거품 텍스처. 파도 마루(FFT Jacobian), 해안선, 그리고 바위·말뚝·보트 주변(깊이 차이)에서 생성됩니다. 시간이 지나며 유지되고 감쇠합니다(High에서는 누적 버퍼).
- 물에 서 있는 말뚝과 바위 주변의 거품 고리와 작은 잔물결.

7.5 상호작용
- addRipple은 실제 높이장 파동 시뮬레이션에 입력됩니다: 플레이어를 중심으로 함께 스크롤되는 256² 핑퐁 그리드. 돌 첨벙, 총알 충격, 빗방울, 물속 플레이어의 발소리가 물리적으로 반사하고 간섭하는 고리를 만듭니다.
- 플레이어가 물을 걸을 때 생기는 항적/Kelvin 방식의 선수파.
- 부력: 보트, 떨어진 상자, 조개껍데기, 돌이 높이 쿼리와 표면 노멀을 사용해 떠다닙니다. 보트는 계류줄을 당깁니다. 보트를 고치세요: 선체가 흘수선 위에 있고, 시작 프레임에서 부두 옆에 분명히 보이게.
- 수중 모드(카메라가 수면 아래): 물색 수중 안개, 왜곡, 코스틱 광선, 먹먹한 오디오(오디오 시스템용 'underwater' 이벤트 발생), 화면을 가로지르는 정확한 반수중/반수면 수면선 분할.

7.6 날씨와 시간 훅
- 모든 신규 파라미터를 water.setParams({...})로 노출하고, 날씨/시간 컴포지터가 이를 구동합니다: 바람이 스펙트럼을 구동하고(맑을 때는 잔잔 → 폭풍 시 화이트캡), 비는 높이장에 물방울 고리와 표면 거칠기를 더하며, 밤에는 달 경로, 일몰에는 황금빛 경로가 생깁니다.

7.7 성능
- High: 256²의 캐스케이드 2개를 쓰는 FFT, 평면 반사 + SSR, 256² 높이장. Low: 64²의 캐스케이드 1개(또는 베이크 노멀), 평면 반사/SSR 없음, 128² 높이장. 목표: High에서 중급 GPU 기준 프레임당 물 ~4 ms 이하.
합격 기준: 시작 프레임에 리프와 코스틱스가 보이는 수정처럼 맑은 터콰이즈 얕은 물, 짙은 파란색으로 떨어지는 선명한 낙차, 해변의 살아 있는 스워시 라인, 부두와 보트의 반사가 보여야 합니다. 던진 돌은 물리적으로 납득 가능한 간섭 고리를 만들어야 합니다.

────────────────────────
스테이지 8 — 지형: 카르스트 산, 바위, 해변, 정글 (reasoning: High)
1. 카르스트 산: 현재 형상 위에 리지드 멀티프랙탈 변위, 수직에 가까운 절벽, 돌출부, 침식 골짜기. 경사 기반 셰이더: 급경사는 수직 줄무늬가 있는 회색 석회암, 돌출부와 완만한 경사는 녹색 캐노피(수관 사이 오클루전이 있는 수관 모양 노이즈). 경사면에 수천 개의 저비용 인스턴스 캐노피 빌보드(드로우 콜 1회). 해식 아치와 바위 섬도 같은 머티리얼을 사용합니다.
2. 바위: 날카로운 리지드 면을 가진 노이즈 변형 바위, 3–7개 클러스터로 그룹화, 모래나 물에 반쯤 묻혀 있고, 상단에 이끼, 수면선에 어두운 젖은 띠. 트라이플래너 텍스처링.
3. 정글: 뭉쳐진 카드 기반 수관을 가진 활엽수; 나이와 기울기가 다양한 야자수; 오른쪽 경사면의 빽빽한 하층 식생(양치류, 관목, 바나나/몬스테라)은 LOD를 적용해 현재 밀도의 3–4×로 늘립니다; 나무 사이 덩굴; 해변 가장자리 풀. 더 이상 "잔디밭"은 없습니다: 나무 아래는 어두운 흙과 낙엽.
4. 해변: 바람 물결(노멀 맵), 스테이지 7 스워시와 동기화된 젖은 띠, 조약돌, 유목, 떨어진 야자 잎, 코코넛; 모래에서 흙, 정글로의 점진적 전환과 풀.
5. 충돌이나 경로를 깨뜨리지 않는다면 오두막과 감시탑을 시작 프레임 안으로 20–30% 더 가깝게 이동하세요.

────────────────────────
스테이지 9 — 한 차원 높은 절차적 머티리얼 (reasoning: High)
모든 제너레이터는 1024²(Low에서는 512²)의 albedo/normal/roughness(/AO) 맵을 생성하며 캐시됩니다.
1. 오래되어 풍화된 나무: 늘어진 노이즈 결, 옹이, 균열, 판자마다 다른 색조와 UV 오프셋, 어두운 이음매, 모서리의 때, 햇빛에 바랜 느낌, 마모된 밝은 가장자리(곡률 기반). 줄무늬 "얼룩말" 같은 모양은 금지. 데크, 테이블, 부두, 상자, 기둥에 사용됩니다.
2. 금속: 곡률/노이즈 마스크로 구동되는 페인트 → 벗겨짐 → 녹, 그리고 녹 줄무늬와 긁힘(배럴, 탄약통, 랜턴). 머그는 법랑이 깨진 모습.
3. 천: 직조가 보이는 캔버스, 얼룩, 바랜 주름. 깃발은 바랜 녹갈색(#a8352a → rust)이며, 찢어진 알파 가장자리와 더러운 해골이 있습니다.
4. 표범 가죽: 정확한 로제트 패턴과 퍼 셸(4–6 레이어, High 전용) 또는 조밀한 노멀 맵, 들쭉날쭉한 가죽 가장자리.
5. 밧줄: 꼬인 섬유 노멀, 더 두껍게, 풀린 끝단.
6. 바위와 모래: 트라이플래너 매핑, 노멀 방향에 따른 이끼; 햇빛 아래 작은 결정 반짝임이 있는 입자가 거친 모래.
로컬에 수작업 타일러블 PBR 텍스처 세트가 있다면 해당 제너레이터 대신 사용하세요(그리고 스탠드얼론 번들에 포함하세요).

────────────────────────
스테이지 10 — 전경 소품 + 커스텀 모델 (reasoning: Medium)
1. models 폴더의 로컬 .glb 모델을 기존 로더로 불러오되 절차적 폴백을 유지합니다. 각 모델마다: 미터 단위 실사 스케일, 표면에 접지, 콜라이더, 그림자, 젖음 주입, 그리고 스테이지 3 상호작용(랜턴/머그/지도 검사; 모델에 별도 뚜껑 파트가 있으면 상자 뚜껑이 열리고, 없으면 절차적 뚜껑을 유지).
2. 테이블: 소품을 더 크게 하고 레퍼런스처럼 배치합니다 — AK는 테이블 전체를 가로질러 대각선으로, 칼은 앞쪽 가장자리에, 지도는 칼 아래에, 머그, 탄약통, 랜턴은 오른쪽에, 병.
3. 왼쪽: 간이침대(튜브 프레임, 처진 캔버스, 통통한 베개), 침대 가장자리에 늘어진 가죽, 침대 옆 배낭과 상자, 녹슨 배럴.
4. 레퍼런스처럼 우상단 캐노피에서 늘어진 찢어진 깃발; 기둥을 감은 밧줄.
5. 부두에 정박한 보트(스테이지 7의 부력), 부두 위 상자, 말뚝까지 이어지는 계류줄.
6. 오두막과 감시탑: 골함석 지붕, 캔버스 차양, 배럴, 상자.

────────────────────────
스테이지 11 — 성능 + 레퍼런스와의 최종 매칭 (reasoning: Medium)
1. 패스별 분석이 있는 FPS/프레임 타임 오버레이(F3). 예산: High에서 중급 외장 GPU 기준 ≥60 FPS, Low에서 최신 내장 GPU 기준 ≥30 FPS.
2. 최적화: 인스턴싱, LOD, 거리 컬링, 비싼 패스의 하프 해상도, 캐시 및 압축 텍스처, 적절한 해제.
3. 시작 뷰에서 스크린샷을 하나 찍어 레퍼런스 옆에 두고 최종 팔레트를 조정합니다. 모든 시간대 × 날씨 조합을 확인하세요.
4. 번들을 다시 빌드하고, 콘솔 검사를 한 번 하고, 상태 로그를 업데이트하세요.